

Originally written by Monojit Dutta, updated by Dibyajyoti Kabi. First published July 10, 2017. Updated October 24, 2026.
To install a custom ROM with TWRP, unlock the bootloader, boot into TWRP, wipe Dalvik, Cache, Data and System, then go to Install, pick the ROM ZIP and swipe to flash. Flash GApps right after if your ROM doesn’t include them, then reboot.
You don’t need root for any of this. The old version of this guide said you did, and that was wrong. What you need is an unlocked bootloader and a TWRP build for your exact phone.
Key points
- A custom ROM replaces the Android build your phone shipped with, like LineageOS in place of One UI or OxygenOS.
- You need an unlocked bootloader and TWRP for your exact model. Root isn’t needed.
- The flash order is ROM first, then GApps, then anything else. Reboot only after all of them.
- Coming from stock or a different ROM, do a clean flash. Wipe Data, or the phone will likely bootloop.
- Galaxy phones on One UI 8 or newer have no OEM unlocking toggle on the models people have checked, so most new Samsung phones can’t run custom ROMs.
What is a custom ROM?
A custom ROM is a version of Android built by developers outside the phone maker. It replaces your phone’s stock software completely. People install one to get a newer Android version after official updates stop, a cleaner phone without bloatware, or features the maker never added.
LineageOS is the best known. LineageOS 23, based on Android 16, came out in October 2025 for over 100 devices. The LineageOS devices list shows if your phone is one of them, along with the codename you’ll need to find the right files.
Do I need root to install a custom ROM?
No. Root has nothing to do with it. You need an unlocked bootloader, which lets the phone boot software that isn’t signed by the maker, and a custom recovery like TWRP to flash the ROM. Root is something you can add afterward with Magisk if you want it.
Unlocking the bootloader wipes the phone, so back up first. The OEM unlocking switch lives in Developer options. My guide on Developer options, USB debugging and OEM unlock shows where it is on each brand.
What do you need before you start?
You need an unlocked bootloader, TWRP for your exact model, the ROM ZIP built for your phone’s codename, and a full backup. Charge the phone to at least 60% so it doesn’t die mid-flash.
- An unlocked bootloader.
- TWRP installed. The official TWRP devices list has the builds and install steps for each phone.
- The ROM ZIP for your exact codename. A ROM for a different variant of the same phone can hard brick it.
- A GApps package if the ROM doesn’t come with Google apps. My GApps guide explains which one to pick.
- A backup of your photos and files, plus a Nandroid backup in TWRP. My guide on Nandroid backups walks you through it.
- A PC with ADB and Fastboot and the USB driver for your phone, in case you need to rescue it.
Read the install notes on your ROM’s download page before you flash. Some ROMs need a specific stock firmware version on the phone first, and that note is the most common thing people skip.
Can I install a custom ROM on a Samsung Galaxy phone?
Only on older models. In July 2025, 9to5Google reported that the OEM unlocking toggle is gone on One UI 8 builds for the Galaxy S25 series, Galaxy Z Fold7 and Galaxy Z Flip7, even outside the US. Without that toggle, you can’t unlock the bootloader. Samsung hasn’t confirmed it officially.
US Galaxy phones with Snapdragon chips never had an unlockable bootloader either. Older international models on One UI 7 or earlier can still be unlocked, but flashing TWRP trips Knox for good. Samsung Pay, Secure Folder and Samsung Health stop working after that.
To put TWRP on a Galaxy phone that still allows it, follow my guide on installing TWRP with Odin.
How to install a custom ROM with TWRP
Here are the full steps. They work the same on any phone with TWRP. The screenshots are from a OnePlus phone running an older TWRP, but the menus haven’t changed much.
- Download the ROM ZIP and the GApps ZIP, and copy both to the phone’s storage or a microSD card.
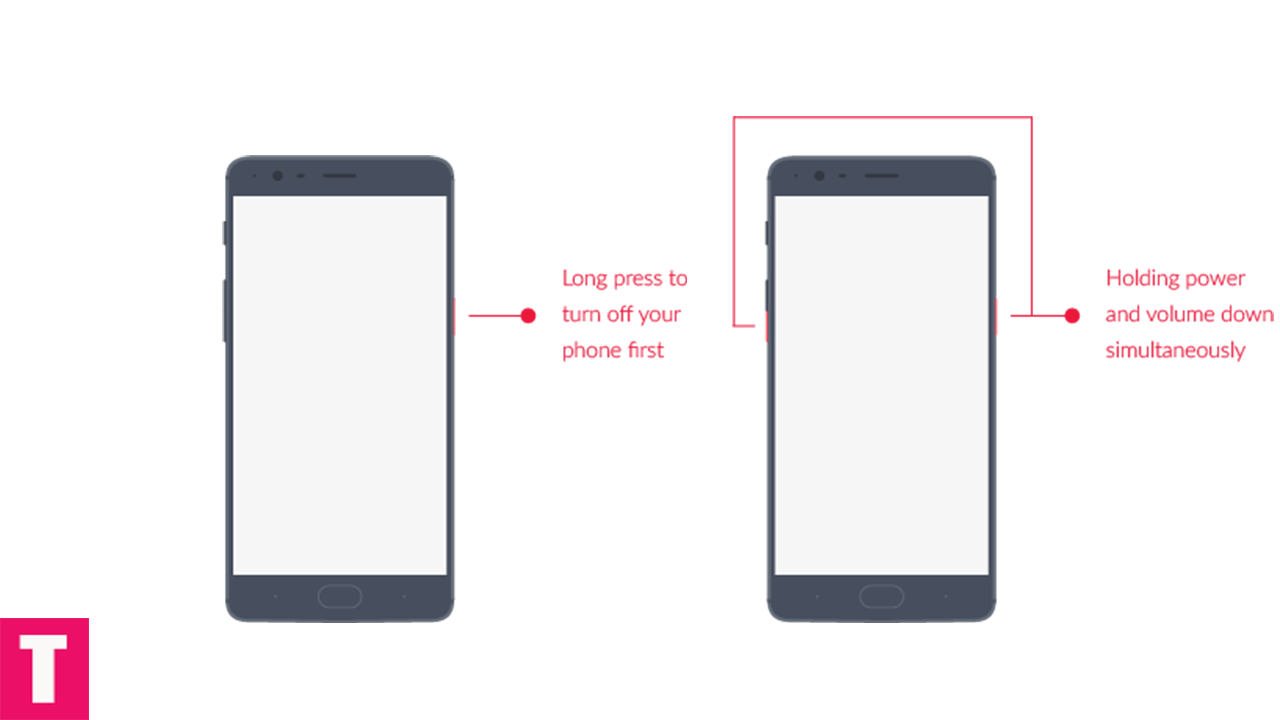
- Turn the phone off and boot into TWRP. On most phones you hold Power and Volume Up. On OnePlus phones it’s Power and Volume Down.
- Make a Nandroid backup with Backup, if you haven’t already.
- Tap Wipe > Advanced Wipe. Tick Dalvik / ART Cache, Cache, Data and System, then swipe to wipe. Don’t tick Internal Storage, or your ROM file goes with it.
- If the ROM’s install notes say so, or you’re coming from stock firmware, go back to Wipe, tap Format Data and type yes. This removes the stock encryption, and it does erase internal storage, so copy the ZIPs to a microSD card or use ADB sideload for this case.
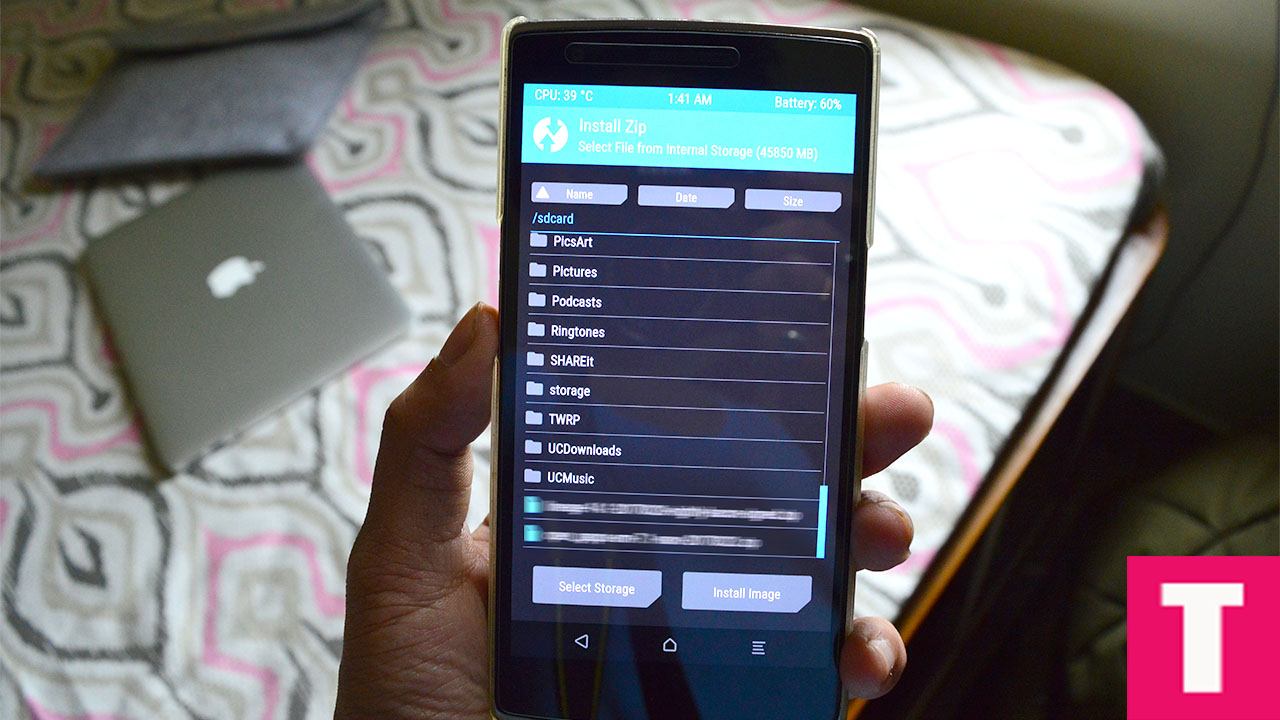
- Go back to the main menu and tap Install.
- Find the ROM ZIP and tap it.
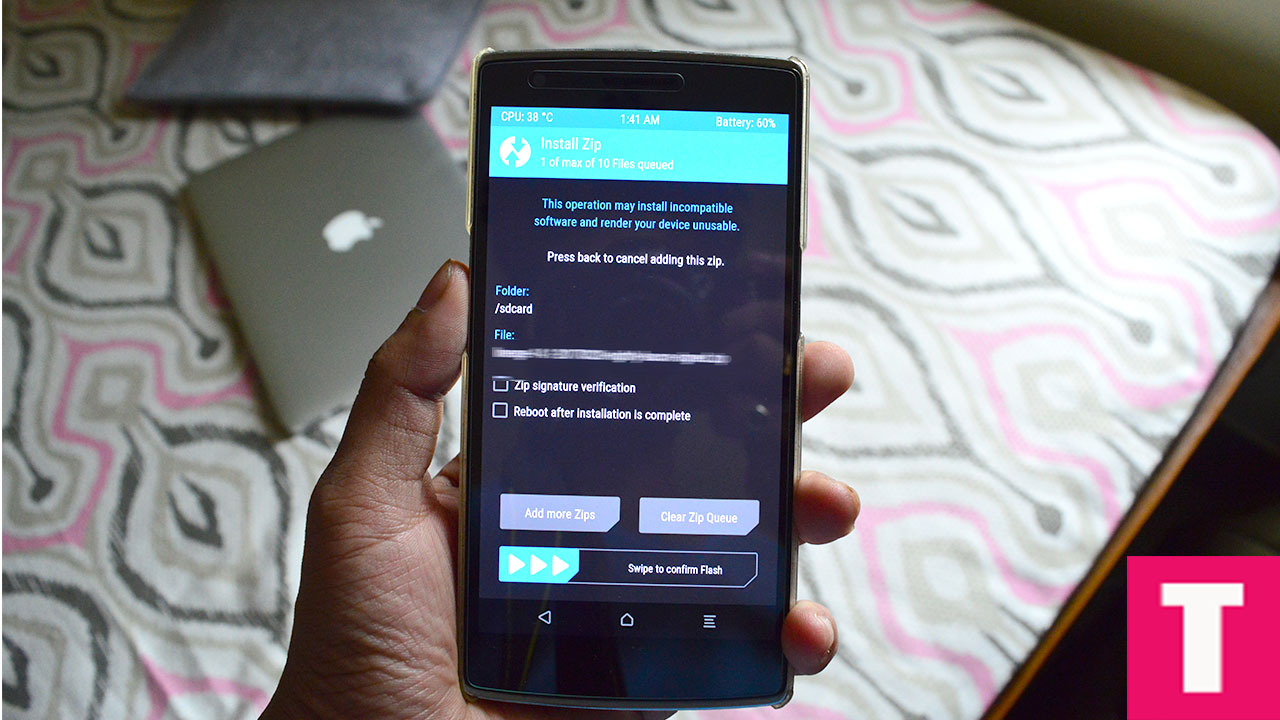
- Swipe to confirm flash and wait for it to finish.
- Tap Back, then Install again and flash the GApps ZIP.
- Tap Reboot System. If TWRP offers to install its app, tap Do Not Install.
The first boot takes longer than usual, often 5 to 10 minutes. Leave the phone alone while the boot animation runs.
No space on the phone after Format Data? You can push the ZIPs from your PC instead. My guide on ADB sideload in TWRP shows how.
In what order should I flash the ROM, GApps and Magisk?
Flash the ROM first, then GApps, then any other ZIP, and reboot only after the last one. GApps has to go in before the first boot. If you boot without it and add it later, Google apps usually crash and you’ll need to wipe Data and start again.
| Order | File | When you need it |
|---|---|---|
| 1 | The ROM ZIP | Always |
| 2 | GApps | Only if the ROM doesn’t include Google apps |
| 3 | Other ZIPs, like a kernel | Only if you want them |
| 4 | Magisk | Only if you want root. Do it after the first boot |
The Magisk install guide no longer recommends flashing Magisk from a custom recovery. Boot the ROM, install the Magisk app from the official Magisk releases page, patch your boot image in the app, and flash the patched image with fastboot.
Should I do a clean flash or a dirty flash?
Do a clean flash, which means wiping Data, any time you install a ROM for the first time or switch to a different ROM. A dirty flash keeps your apps and data, and it’s only safe when you update to a newer build of the ROM you already run.
For a dirty flash, wipe only Dalvik / ART Cache and Cache, then flash the update ZIP. Mixing data from two different ROMs is the most common cause of bootloops and force closes, so if in doubt, wipe.
Why does TWRP say “Error 7”?
Error 7 means the ROM’s install script checked your phone’s codename or firmware and stopped, because it doesn’t match. Either the ROM is for another model, your TWRP is too old, or the ROM needs newer stock firmware. Read the lines above the error in TWRP, since they say which check failed.
Download the ROM for your exact codename, update TWRP to the latest build for your phone, and flash the stock firmware version the ROM asks for. Old guides tell you to edit the updater script to skip the check. Don’t do that. The check is there to stop you flashing the wrong files.
How do I fix a bootloop after flashing a custom ROM?
Give the first boot 15 minutes. If it’s still on the boot animation, boot back into TWRP, wipe Data, Dalvik / ART Cache and Cache, and flash the ROM and GApps again. A bootloop after a ROM install is almost always leftover data from the old ROM or missing firmware.
If the phone still won’t boot, try these in order.
- Use Format Data in TWRP, then flash again.
- Check the ROM’s page for the required stock firmware or vendor version, flash it, and try again.
- Flash without anything extra. Leave out Magisk, kernels and mods until the ROM boots on its own.
- Restore your Nandroid backup from Restore in TWRP.
How do I go back to stock firmware?
Flash the official firmware for your model with the maker’s tool. On Samsung phones you use Odin, and my guide on flashing stock Samsung firmware with Odin covers every step. On a Pixel, flash a factory image from Google’s factory images page.
Flashing stock wipes the phone and replaces TWRP with the stock recovery. You can lock the bootloader again after that, but only once stock firmware is fully installed. Locking it with a custom ROM still on the phone can hard brick it.
FAQ
Does installing a custom ROM void my warranty?
It can. Many makers treat an unlocked bootloader as outside warranty, and Samsung’s Knox counter stays tripped for good once unofficial software boots. Going back to stock firmware doesn’t reset Knox. Check your maker’s warranty terms before you unlock.
Will installing a custom ROM delete my data?
Yes. Unlocking the bootloader wipes the phone, and a clean flash wipes Data again. Back up your photos, chats and files to a PC or cloud storage first. A Nandroid backup saves the system too, but keep a separate copy of your personal files.
Do banking apps and Google Wallet work on a custom ROM?
Not always. Many banking apps and Google Wallet check Play Integrity, and that check often fails on a phone with an unlocked bootloader or a custom ROM. Some apps refuse to open, and tap to pay may stop working. Check whether your bank’s app works before you rely on it.
Can I install a custom ROM without TWRP?
Yes. Many ROMs now ship with their own recovery, and LineageOS uses Lineage Recovery as its default. You flash that recovery with fastboot, then install the ROM with ADB sideload from your PC. The steps are on your phone’s page in the LineageOS wiki.
Can I install a GSI instead of a device ROM?
Yes, on phones with Project Treble support. A GSI is a generic Android build that runs on many phones. It’s a good option when nobody makes a ROM for your exact model. My guide on installing a GSI explains how it works.
Related guides
- How to sideload flashable ZIP files with TWRP
- How to make a Nandroid backup in TWRP
- Download GApps for custom ROMs
- How to enable Developer options, USB debugging and OEM unlock
- Install TWRP on a Samsung Galaxy phone with Odin
That’s it. Wipe, flash the ROM, flash GApps, reboot, and give the first boot a few minutes.
Stuck on the boot animation or seeing an error in TWRP? Leave a comment with your phone model (like SM-G998B or Pixel 7 Pro), the ROM you’re flashing and the exact TWRP error, and I’ll help you figure it out.