WiFi calling is a new and a very useful feature which was most recently introduced to Android smart phones. But unfortunately not all Android phones have this option and even if they do support WiFi calling, some OEMs or Carriers who sell the device disable them by default.But if you are a Verizon user, then you can Enable WiFi Calling As Preferred Option On Verizon Pixel & Pixel XL.
For instance, Verizon disables the WiFi calling option in the Pixel phones they sell. So you cannot enjoy the quality of WiFi calling by default on your phones. However, there is a simple workaround for this and don’t worry it is a very quick and an easy process and you don’t have to root your device for this.
This trick will enable the WiFi calling option on your Verizon Google Pixel and Pixel XL devices and you can set it as the preferred option to place calls so that your calls would automatically be placed over WiFi whenever your cell reception is poor or unavailable. This not only saves your battery life but also improves the quality of your calls.
DISCLAIMER
Table of Contents
TheDroidGuru.com is not responsible for any damage happened to your device(s) while following this guide, Proceed at your own risk.
Must Read: How To Get Mac-Like Touch Bar On Any Android Device
PRE-REQUISITES
- This Guide is only for Verizon Google Pixel / XL
- We recommend to take complete backup and proceed.
Steps To Enable WiFi Calling As Preferred Option On Verizon Pixel & Pixel XL
Step 1: The first step is to install the USB drivers for your phone on your PC. You can select the specific drivers for your phone from here.
↳This step is essential as you would be transferring commands from your computer to your phone.
Step 2: Next in order to access the Android Debug Bridge (ADB) Through which the commands would be transferred you have to download ADB Binary files for your device.
You can download the zip file for your OS here. Windows. Mac. Linux.
Step 3: Once the download is complete extract the zip file to your desktop or some place you could easily access.
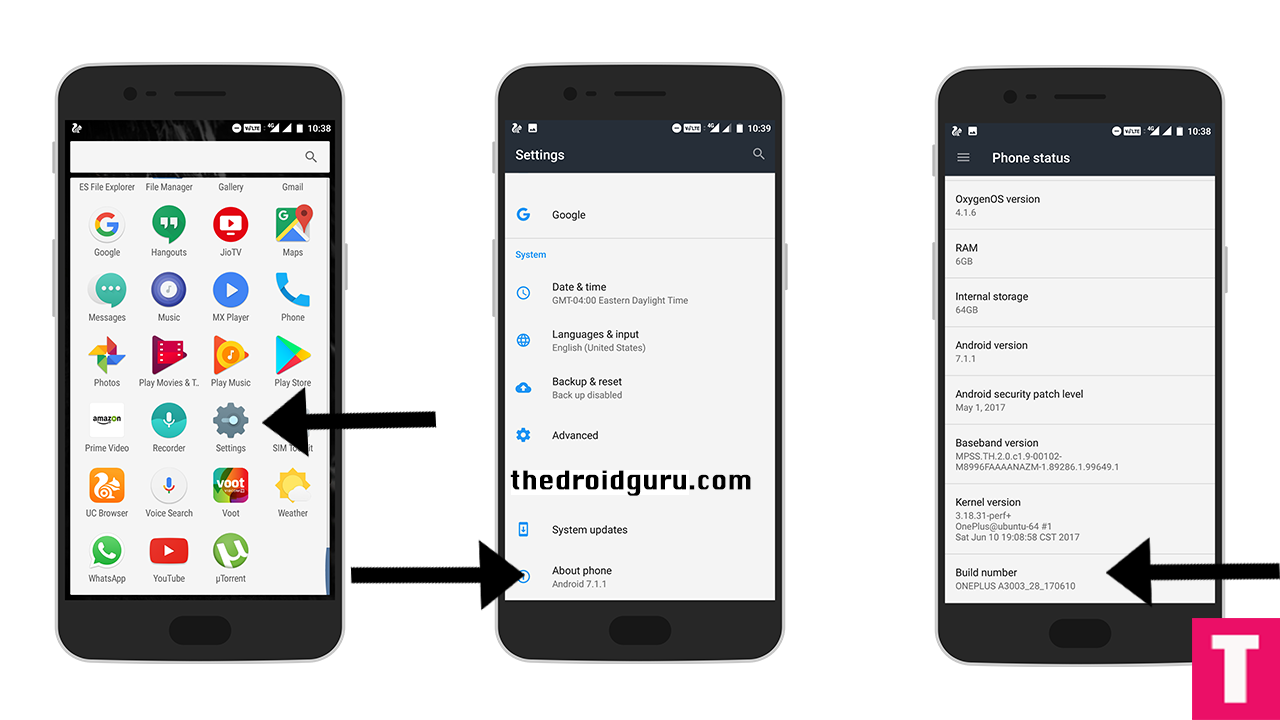
Step 4: Now Go to the settings app on your phone and then scroll to the end where you would find the About Phone Option. Open it and then find the build number of your device, it is normally in the end.
Just tap on the build number 7 times and it will enable the developer options for your device. Go back to the home page of settings and then open the developer options. Enable USB debugging option from the list. This is just for ensuring a proper connection between your phone and your PC.

Step 5: Now connect your phone with your PC using your USB cable and then select the File transfer option from the notification that pops up on your phone.
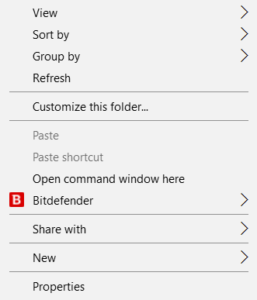
Step 6: Now open the location on your computer where you have extracted the ADB files and then open a command window there. You can do this by simply right clicking on an empty space inside the folder while holding the shift key on your Windows PC.

Step 7: Now enter the following command in the command window. You will get a notification on your phone to allow USB debugging, just select ok.
adb device
Now enter adb devices again and this time the command window will display the serial number of your device. This means you have done everything right.
Step 8: You have to enter the adb window by entering adb shell in the command window. Once done, enter this final command to enable WiFi calling as the preferred option.

settings put global wfc_ims_mode 2
Step 9: The option will now be enabled on your device and you could check it by toggling your Airplane mode on and off and then look for the option from the more section in your WiFi settings page. The WiFi preferred option will now be active.
All we have done here is to enable the WiFi preferred option which has been disabled before by changing the value from 1 to 2 as seen in the final command.
Let us know in the comments below if you are stuck at some point or confused what to do.
Raja
Hello! I am Raja, a tech enthusiast who loves to read and write anything related to technology. I listen to music and watch a lot of movies and TV series during my free time. I am an ambivert and I am funny sometimes.
