Here we are sharing a detailed guide to Flash/Install Stock Samsung Galaxy ROM Using Odin. If the Custom ROM on your Samsung Galaxy device is faulty or you want to flash back to the previous Stock Galaxy Firmware, you need to follow the following guide rigorously to flash or install stock Samsung Galaxy ROM / Firmware Using Odin Flash Tool on your Windows computer.
Odin is a Windows-based ROM flashing tool for Samsung Galaxy devices based on Android Platform.It is used to flash custom ROMs, Official OTA Updates, kernels on Samsung Galaxy devices.It supports .tar or .tar.md5. file format.All the Samsung official Update firmware is in this file format.Odin Flash Tool is developed by Samsung and it is safe to use.
Remember, you should have the right Firmware according to your device’s model number otherwise, you may brick your phone.This method can be used to flash the OTA updates files manually.
Similar Guide: How to Install TWRP Recovery On Samsung Galaxy Device Using Odin
Steps To Install Stock Samsung Galaxy ROM Using Odin Flash Tool
Step 1. Download the Stock ROM compatible with your Samsung Galaxy device. After downloading the compressed file, extract it on your hard drive. You can also try Samsung Updates to find the correct stock firmware.
Step 2. Download Odin 3 and extract the downloaded file in a different folder other than the above one. Then right click on Odin Application file and click on “Run As Administrator” option from the menu.
Step 3. Turn off your Samsung Galaxy device. Then boot the device into Download mode. To do so, press and hold the Volume Down button, Home button, and Power button at the same time. When the device starts vibrating, release the Power button only. Keep a hold on the Volume Down and Home key. This will boot your device into Download mode.
Step 4. Once you see the download mode, you will see a warning triangle with yellow color. When you see it, press Volume Up button. Then you will see the screen “Downloading…”
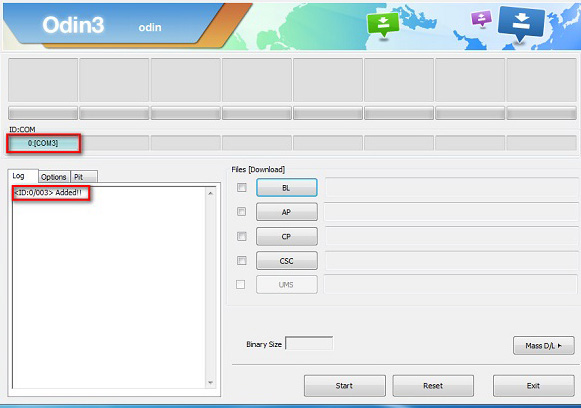
Step 5. Connect your Samsung Galaxy device to your computer using USB port. Odin 3 is already running, and it will recognise your device automatically. At the lower left side of the Odin 3 interface, you will get the message “Added” which means the device is connected successfully.

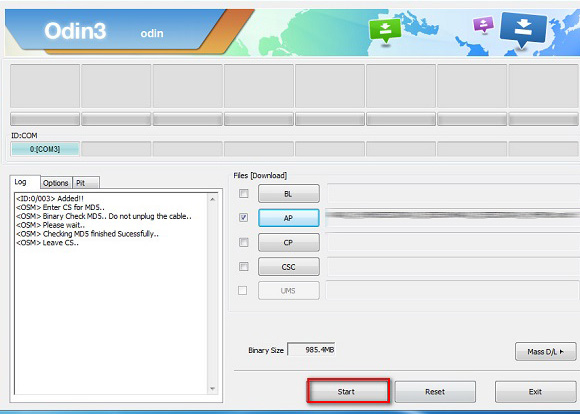
Step 6. Now find the button “AP” and click on it. Select the file that ends with tar.md5 that you extracted in Step 1, and it contains the stock ROM. Then click on Start button on the Odin 3 interface.

Step 7. Wait for the process to complete. Please note that your device might reboot during the process. Once the process is done, you will see “Pass” on the Odin 3 interface at the top left corner with a green highlighter. Disconnect the device with your computer.

Step 8. Boot your Samsung Galaxy device by pressing the Home key, Power key and Volume Up key. Once the phone vibrates, release the Power key and hold on to the rest. This will make your device boot in Recovery Mode.
Step 9. In Recovery Mode, select the option Wipe Data/Factory reset using the Volume Down key and go for it. Finally, give a restart to your device, and it will boot naturally now.(This may take few minutes)
If you have any question related to this post leave that in the comment below 🙂
Monojit Dutta
Hello Everyone, I am a B.Tech(CSE) graduate and blogging is my passion. Article writing is my profession and I am an Ex-Infoscion. Tech articles are my strength though I have worked with many popular viral Entertainment sites. Looking forward to your feedback for my articles. Thanks.
